Beading With Your Router
Howard Lewin
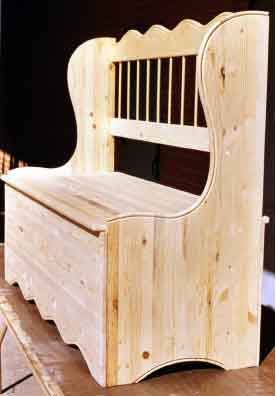
Have you ever wondered how to make a beaded curve? The detail itself is strikingly simple but adds an elegant touch. At first it seems almost impossible to accomplish, because of the way that we have been taught to use our routers; however this technique is easy to learn and inexpensive to set up. What you are about to discover can be used not only to put beads on curves, but also many other decorative edge details, such as ogees, grooves and coves. See beading detail in photo number 1 and 2
Photo number 1
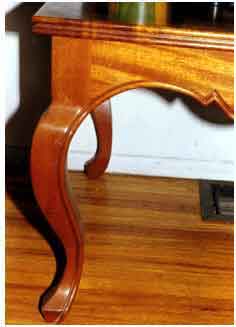
Photo number 2 shows beading following the curve of a leg.
Choosing a router that you can modify to do beading is not difficult. I prefer routers that have pre-drilled holes in the head. The Porter Cable routers # 1002 and # 690 have such holes. Other brands with pre-drilled holes can be used just as effectively. Pre-drilled holes eliminate the necessity of drilling your own. See Photo number 3.
An additional plus for the above mentioned routers, is the ease with which their bases can be detached. They simply screw on and off. Some other brands don't.
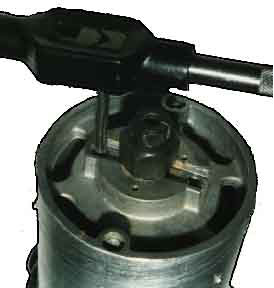
Photo number 3 Shows Tap In Router Head And Pre-Drilled Holes. Make sure that you tap both holes.
Another important criterion in choosing a router is the ease with which it can be held in your hands. How comfortable is it to hold and can you hold it firmly to control it? A fat router will be hard to hold and handle. I feel comfortable with a router diameter of 3 1/2" to 4". Being able to hold the router tightly is very important. This will become evident later in the article. See photo number 11.
Thirdly, does it have enough horse power to cut through the wood without bogging down? 1 HP - 11/2 HP is quite sufficient. An under-powered router can cause burning and chip out. On the other hand, if the router is too powerful, more than 11/2 HP, you will not be able to control it, and a serious accident could occur.
Making the setup on the router is not demanding, and the hardware is not difficult to find. You will need a 3/16-24 TPI or a #10-24 NC tap on Porter Cable routers. These sizes are the same. You will also need a 3/16 - 24 or 10-24 bolt 1 3/4" - 2" long. You can also use 3/16 - 24 all-thread. Additionally, you will need some washers, nuts, connectors and possibly a T-nut. All of these items are available at your neighborhood hardware store. See Photo number 4.
All thread with "T" nut and lock nut. Bolt with ConnectorRivet. Nuts and all thread
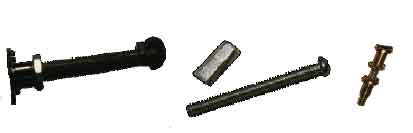
Photo number 4 shows three different capstan guides. All are fabricated from parts found at your local hardware store. This selection gives you alternatives. Choose whichever you find most suitable.
There is one additional piece of hardware left to fabricate. It is a chip guard. This is made out of a piece of acrylic plastic, 1/8" x 2" x 5" in size. Bend the acrylic over a 13/4" dowel by applying some heat to it. Drill a small hole in the plastic, and use a pop rivet to attach a small angle bracket to the guard. See Photo number 5. An easier way to fabricate this piece is to cut a length of 1 3/4" diameter plastic tubing in half.
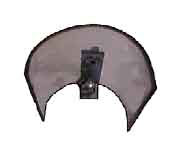
Photo number 5 shows assembled guard.
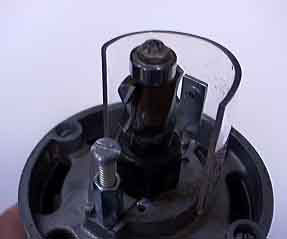
Photo number 6 shows assembled guard.
The next step is to tap the holes in the router. Using the tap sizes referred to in the previous paragraph [3/16 - 24 or a #10-24 NC], insert the tap into the hole located in the router head. (See Photo number 3.) It is very important to hold the tap straight and parallel to the router body. Make sure you thread the hole all the way through. Tap threads in both holes. See photo number 3.
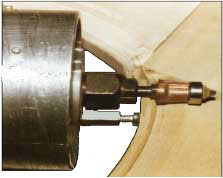
We are ready to assemble our capstan guide. This is done using a connector as a nut. If you can't find a connector, use two nuts. Flatten the bolt head or purchase a flat head bolt. (See Photo number 4.) Insert capstan guide into threaded hole in the router and tighten lock nut. Another way to fabricate the capstan guide is to use all-thread, a T-nut for the head, and a nut to lock it. Use two nuts at the foot to lock the all thread into the threaded hole. (See photo numbers 2 and 3.) When you insert the capstan guide into the hole, screw it in so that it is firm, but not so far into the hole that it hits the rotor vanes of the router motor. Make sure to tighten the lock nuts. (See Photo number 7.)
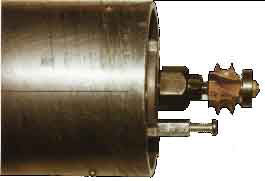
Photo Number 7. Lock Nut. Make Sure That It Is Tight. Guard removed for clarity. Alignment of Capstan Guide And Router Bit.
Now it is time to insert the router bit, and set the capstan guide so that only that part of the router bit detail that you want will enter the wood. Loosen lock nut to adjust capstan guide as illustrated. (See Photo number 4.) For beading choose the beading bits, for ogees use ogee bits, well you get the idea. Most of these bits can be purchased off the shelf from router bit distributors, and woodworking catalogs. If you canÕt find what you want, go the your nearest sharpening co. and have them custom grind what you need. This is what I had to do. It gives you greater flexibility as to what you can do, for any detail that meets your needs can thus be used. Photo number 8 shows some of the bits I use. It also shows the blank of a standard 1/4" bullnose bit, that I had custom ground to make a 1/4" beading bit.

Illustrated in Photo number 8 are some of the router bits that can be used with this technique.Top row, Ogee, Groove/Trim, 1/4" bullnose. Bottom row, 5 degree laminate trim bit, 1/4" bead, and 3/8" beading bit.
To control the depth of cut, you can vary the router bearing sizes. Keep a selection of them handy.(A selection of various diameter bearings should be a part of your router bit kit.)The bigger the diameter of the bearing, the shallower the cut. When you first start, it is wise to use a larger diameter bearing, to prevent any mistakes as to depth. You can always attach a smaller diameter bearing, and go deeper, but not vice versa. Additionally, since smaller bearings cut deeper, the bit tends to grab more. This causes a certain amount of anxiety often referred to as the "white knuckle grip syndrome."
Let's back up a bit now. Make sure that the radius of the curve you are going to bead is big enough for you to swing the router. (Refer to photo number 10) If the router cannot complete the arc, it can cause a grab. This radius will depend on the router's length. Most of mine are 8"-10" long. (See photo number 10.) Additionally, sand the edges very well so that the capstan guide will ride smoothly. Any bumps or saw cuts not sanded well will create unevenness and be copied by the router. It is helpful to scribe a pencil line to give you a general idea of the router's path. This is very useful if you have stop cuts that will require carving . (See photo number 2 and 9.)
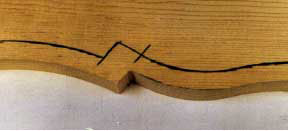
Scribe lines showing path of cut, and stop locations. Photo number 9.

Photo number 10 Shows stop cuts, and lines that will be carved. See photo number 2.
Let's start routing our beads. Turn the router on. Grasp it firmly with both hands, making sure that the capstan guide is pressing against the curve, and gently lower the router bit into the wood. Never try this while holding the router with one hand. Never start the router while it is against the wood. (See photos 11 and 12.) Keep lowering the bit into the wood until the bearing is riding on the flat of the board's surface. Now move the router, right to left, ie. to the left. Maintain pressure against the wood. If there is insufficient pressure the router bit will begin to chatter. Make sure that the capstan guide stays in contact with the curved edge and is perpendicular [90 degrees] to the cut. Additionally, make sure that the router is parallel to the floor. If the router is held too high, the detail will not be complete. If held to low, it will cut away to much. I should advise all who attempt this neat technique, to first practice repeatedly on scrap wood. This is especially true if the wood you are going to use is expensive.
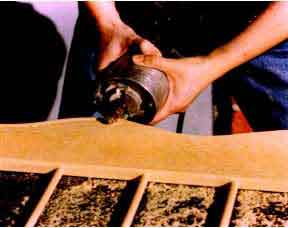
Photo number 11 shows how to hold the router. Guard removed for clarity.
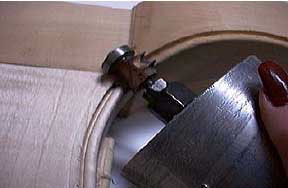
Photo 12 Showing allowable radius.Guard removed for clarity.
Now you can leave the bead as it is, or you can make an additional cut that will relieve the "v" groove. This will make the bead stand out more. I use a plastic laminating trim bit. They are usually about 5-10 degrees. Set the capstan guide so the router bit cuts behind the bead. Install a small enough bearing so that the wood is cleared, leaving the bead standing alone. (See photo number 13.)
Using a 5-10 degree laminate trimming bit to remove material from behind the bead. Photo Number 13. Guard removed for clarity.
Almost all of the edge detail bits can be utilized using this technique. There is danger in trying to use bits that are large, as they tend to grab. Always wear adequate eye protection. Remember to enter the wood slowly, with control. Don't push the router in. Let it feed itself into the wood. Keep your mind on what you are doing! This operation requires your full attention. These safety tips will help prevent an accident. Once you have practiced and mastered its subtleties this technique will enable you to enhance any curve with beads, ogees, coves or grooves. You will be the envy of your woodworking buddies.
Copy Right © Howard Lewin 1998 All Rights Reserved