Turning Hollow Vessels
By Howard Lewin
During the past few decades there has been a revolution in wood turning tools,
from lathes and chucks to gouges and boring bars. As a result, what once was
deemed difficult or impossible to turn has become commonplace.
In the area of hollow-vessel turning, two innovators stand out. The first is David Ellsworth, who in the 1970s began turning vessels with small openings. His first tools were scrapers he had bent with a welding torch. Later he developed longer-handled tools with swivel tips that held machinist’s tool bits. These offered more control and safety and could produce a wider variety of enclosed-vessel forms. Jerry Glaser, an aerospace engineer and hobbyist wood turner, took the ball from there, working to reduce the long tool’s tendency to catch and jerk downward. Several prototypes later, he came up with a double-articulated swivel—which places the cutting edge at the tool’s centerline.
This made it easier and safer to turn vessels up to 12 in. deep. When Glaser added 5-ft., 6-ft. and even 7-ft. handles, it became possible to go as deep as 30 in. Other variations followed and continue to emerge, making new vessel forms possible.
I use a Glaser-designed boring bar for my hollow-vessel work. The tool has a long aluminum handle filled with buckshot to dampen vibrations. The tip is double-articulated and there is a large counterweight attached to the bar to reduce the impact of catches, which can be murder on the wrists. End-grain is especially difficult to cut into, but this tool’s innovative design makes the job much less daunting. The other key to success is using green wood.
Aside from
the joy and ease of turning wet wood—ribbons just stream off the workpiece,
even in end grain. I also like the subtle way green wood moves and dries.
Many turners avoid green wood because of its tendency to crack as it dries.
However, as I explained in an earlier article on green-wood bowls (FWW #147,
pp. 48-53), the drying process is easily controlled, reducing the likelihood
of checking. The first key is to keep the vessel walls thin and uniform, which
not only allows the walls to flex but also equalize drying stresses. The second
is to wrap the freshly turned vessel in a brown paper bag to slow the release
of moisture. Following these guidelines, I seldom see checks or cracks.
Outside first
Turn the outside of this piece just as you would turn the outside of any green-wood vessel. Start by locating the blank in a log and chainsawing it free. Remember, in this end-grain vessel, the grain runs straight through the piece from top to bottom. You also can choose a face-grain blank with the grain running from side to side through the piece, but I’ve found the end-grain orientation to be a bit more stable during the hollowing process. Having said this however, I have had some success with pith centered pieces.
Generally I avoid the pith, or center, of the log for this type of vessel. The 2 in. or 3 in. at the center is the most unstable part of the log and the most prone to cracking while drying.Rough out the general shape on the bandsaw, cutting the bottom of the blank as flat as possible for a good mounting surface. Attach the faceplate with at least six or eight #8 by 1-1/2-in., coarse-threaded drywall screws. After mounting the long blank on the lathe, put a live center in the tailstock and tighten it against the far end to add support.
It helps immensely to have a variable-speed lathe, because a large blank must revolve slowly at first to create an appropriate cutting speed at the outer edges. Then, as the workpiece gets smaller, the lathe speed can be raised slowly to create the same ideal cutting speed at the perimeter. However if you have a finite number of speeds to choose from, always err on the side of caution. It’s better to take a little more time than risk a flying workpiece.
I turn the outside using a long, hefty bowl gouge developed by Glaser, which is available from The Woodturners Catalog (800-551-8876) for $95 to $170, depending on the size. The tool features A-11 tool steel, a deep flute and an extreme fingernail profile on the tip, and makes the task go quickly and smoothly. With the grain running parallel to the bed of the lathe, all cutting on the outside should be done downhill—as if it were a spindle turning. In other words, cut from the largest diameter toward the narrowest parts (at each end in this vessel). Make the last pass a light planing cut, with the gouge riding its bevel, which leaves the smoothest surface possible for sanding.
I like to
turn a shallow foot at the bottom of my vessels, roughly one-third of the
vessel’s diameter and long enough to contain the screw holes. Later,
after hollowing the inside of the vessel, I’ll hollow the foot as well,
which will remove the screw holes and keep all the walls of the vessel roughly
1/4 in. thick for successful drying.
The hollowing process
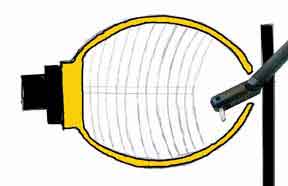
After sliding the tailstock out of the way, drill a deep hole to establish the depth of the cavity and to give the boring tool a place to start. You can put the bit in a drill chuck and hold the chuck in your hands to drill the hole. Just support the bit on a tool rest as you feed it into the center of the stock. Make sure to pull the drill bit out frequently, about every inch or so to clear the shavings. If you don’t clear the shavings compressed in the drill’s spirals, there is a tendency for the bit to grab especially, if you try to force the bit. As the hole nears its final depth, check it frequently against the overall height of the vessel. Be sure to figure in the height of the foot and thickness of the bottom wall.
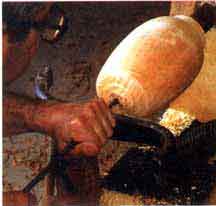
photo courtesy of Fine WoodWorking Showing the drilling process
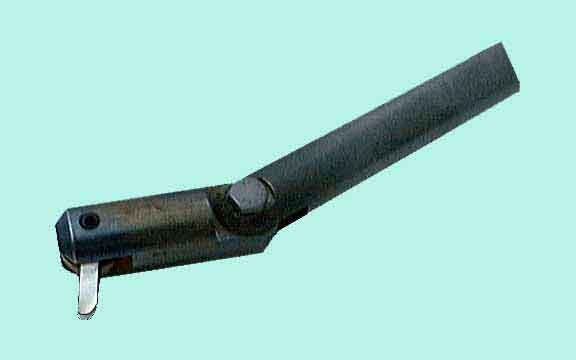
I use Glaser’s swivel-tipped boring bar to make all of the hollowing cuts, but there are other recent innovations, such as the Dennis Stewart tools , that can handle this task. (Both the Glaser boring bar and the Stewart system are also available from The Woodturners Catalog, for $150 and $200, respectively.)
The 3/16-in.-square tool insert on the Glaser boring bar can either scrape the wood or slice it, depending on the angle at which it’s held. Scraping is not usually feasible with green wood, but this small point can either scrape or cut and resists catches, which happen when the tool gets stuck in the wood, often drawing it in more deeply and damaging the workpiece. The angle I favor for hollowing is halfway between the two—sort of a peel. The mass of the boring bar and counterweight work to keep it steady. The tool bit is Cobalt High Speed steel—and will hold an edge for a long time.
 |
Straight bit, and 45 degree angle bit
45 degree bit articulated.
After the hole has been drilled, set the double-articulated tip of the boring bar in a straight line and begin to widen the opening to give yourself room to work. Then articulate the end into the hook shape to reach around the inside corner . The tip of the tool bit should be aligned as closely as possible with the centerline of the bar. This will reduce the torque on your wrists.
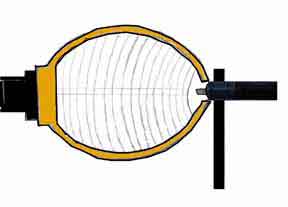
Using boring bar, with the cutter set straight to make the initial cuts.
After the initial cuts have created some working area, the tip is then rotated to about 45 degrees to access the sides.
This configuration creates a tremendous amount of torque, and is hard on your wrists.
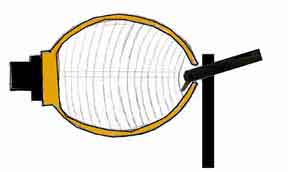
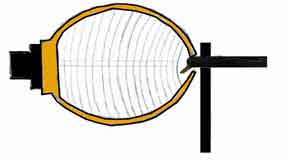
Continue making cuts until there is more room so that the tip can be rotated at the articulation.
Finally the tip is rotated at the articulation to lessen the grab and complete the cutting.
This set up creates little torque, and therefore is much easier on your wrists.
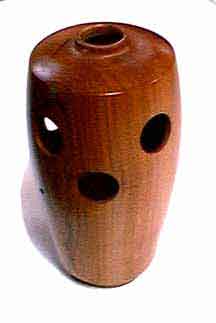
The diameter
of the entrance hole is an important design consideration and should be kept
in proportion to the overall piece. Many turners try to keep this opening
very small to demonstrate their skills and to confound collectors. I don’t
go to those extremes, but I like to keep the hole small enough to be pleasing
to the eye and keep probing fingers and eyes from the interior. That way I
don’t have to attempt to sand the inside.
Plan of attack
The order and direction of the cuts when hollowing is the same for any end-grain vessel, open or closed; it’s just a little more painstaking and time-consuming with the boring bar and the small tool bit than it is with a bowl gouge. Each cut starts at the center and is pulled toward the inner wall of the vessel. Green wood is especially pliable, so once a thin wall has been established, it becomes too floppy to return to later. So work toward the wall, establish the right thickness and then move back to the center of the hollowed area to begin another cut. Don’t attempt to take a little off an area that you turned five passes earlier. There won’t be enough material nearby to support the cut, and you will risk stressing and breaking the wall. I use long calipers after each cut to check wall thickness. I also periodically hold a portable lamp against the outside of the vessel and examine the light getting through, which quickly highlights any inconsistencies in thickness.
You must
remove shavings from the inside as you go. Centrifugal force will plaster
them against the side of the vessel, making the surface very difficult to
penetrate. Trying to force the tool through this layer generally ends in disaster
because the tool catches and goes through the side. I stop the lathe every
two passes and use compressed air and a shop vacuum to clean out the vessel.
When you reach the bottom of the drilled hole, the hollowing is done. Check
the bottom thickness with the lamp just as you did the sides.Leave the vessel
on the faceplate for about a day to let the surface moisture flash off, then
remount it on the lathe and sand the outside.
Hollowing the foot and drying the vessel
Last, remove the vessel from the faceplate, mount it in the reverse position and hollow out the foot, so all the walls are the same thickness. The reverse position is achieved with a jam Chuck and a live center with a cup-shaped tip. The cup center is much less likely to split the bottom than a pointed center. I do this hollowing with a thin bowl gouge, which allows me to work around the live center. The small tenon left connecting the vessel to the center can be knocked off later with a sharp chisel.
Photo Courtesy of FineWoodWorking
Showing Reverse Turning Set Up.
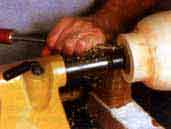
Photo Courtesy of FineWoodWorking
Reverse Turning Set Up.
Now the vessel is ready for final drying. With three or four paper bags wrapped around it and curled shut, the vessel should be able to relieve its own stresses as it slowly releases moisture. Be ready for some subtle warps or bulges as the vessel goes from wet to dry. I think of these mysterious changes as the character of the tree revealing itself. When the bags feel dry to the touch—usually after five to ten days—the piece is dry. Give it a fine sanding by hand and seal it with your finish of choice.
- Home
- Articles
- Fine Woodworking For The Published Article