DYED DOWEL TURNING
by Howard Lewin
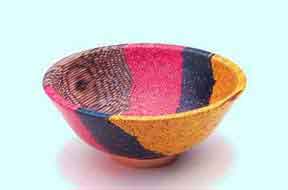
In my ceaseless search for new and exciting wood and materials to turn on the lathe, I discovered Parallam; 1/8"x3/4" veneer strips, compressed with glue to form strong, stable, laminated beams used in construction. The colors and texture are fascinating, but it is difficult to obtain. I decided to make my own version of Parallam, using dyed dowels instead of veneers.
I use 1/8" dowels; they nest tightly when clamped, and dye will penetrate fast and deep into the wood. Larger diameter dowels can be used, but the larger the dowels, the greater the gaps will be. I use maple or white birch, so the dye colors are not degraded by the natural color of the wood. Dyed dowels give an interesting texture and pattern to the finished piece.
The dying process is simple, but messy. Wear gloves! I forgot to wear gloves once when I was dying several batches of red. The dye wouldn't come off my hands! I went to the bank and noticed the teller staring at my hands. I said, "It doesn't hurt." She almost passed out cold on the floor. She thought I had cut myself, when, in fact, all I did was get red dye all over me!
I use aniline dyes because the colors are intense. They come in powder or liquid form. The powdered dyes give more flexibility; they dissolve in water, lacquer thinner, or alcohol. I use methanol (methyl alcohol); it dries much faster than water and is cheaper than lacquer thinner. Water requires a much longer soaking time, raises the grain, and greatly extends the drying time. Lacquer thinner and methanol require about the same drying time, but methanol is about half the price. It can be purchased at paint stores as methanol, shellac thinner, or denatured alcohol.
Mix the dyes in plastic containers. I use pickle jars with airtight lids to help prevent evaporation. Add dye to methanol until the color pleases you. Use a dowel to check the color.
Place the dowels in Tupperware or other airtight containers. Methanol is very volatile and will evaporate quickly unless you use an airtight container. Pour the dye over the dowels. The dowels will float, so put a weight on them to keep them submerged. As the dowels absorb dye, the level of solution will go down, creating inconsistency in color. Refill the container with extra dye after an hour or two of soaking to maintain consistent color. The usual time required for soaking is 24 hours. The longer the soaking time, the more intense the colors will be, and the deeper the dye will penetrate. WARNING: Methanol is extremely flammable! Work in a well-ventilated area, away from any possible ignition source!
After about 24 hours, I remove the dowels from the containers and air dry them on a rack made with chicken wire. It normally takes a full day to dry completely; on hot, dry days, 12 hours is sufficient. Don't rush into gluing before the dowels are dry! You don't want gluing problems! If drying must be done indoors, use caution: choose a well-ventilated area away from any possible ignition source!
The natural nesting of dowels is a hexagon. Make a form with sides at 60 degrees and a base that will accommodate the faceplate you will use. I use dowels cut to 12" to give me turning blocks approximately 12"x12". Make the form before you start gluing, and make sides you can take off. Dry test the form, filling it with dowels to determine the amount of dowels needed to fill it. It takes about 3,000 dowels (1/8") to make a block 5"x12"x12". You can make a straight-sided form, but 60 degree sides save a lot of dowels and a lot of money!
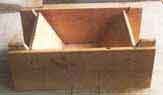
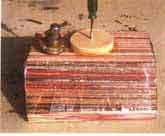
You also need some kind of a press to keep pressure on the dowels in the form. I used 2"x 6"s and bolts to make the press and applied pressure with a car jack. (see photo)
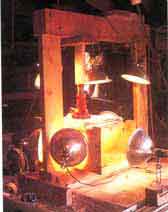
Most woodworking glues will work. I use powdered Weldwood Plastic Resin glue. It helps fill gaps, is easy to mix, can be found at most hardware stores and woodworking suppliers, will take the color of the dyes as dowels are mixed in the glue, and is for all practical purposes, waterproof. There are drawbacks: the large block absorbs moisture from the glue, and a 70 degree minimum temperature at the glue-line must be maintained until the block is totally cured. To maintain 70 degrees at the glue-line, you must have a heated shop or surround the press and form with about six 100 watt light fixtures. This can bring the glue-line temperature to about 80 degrees. You need about four-and-a-half pounds of powdered Weldwood Plastic Resin glue for each 3,000 dowel (1/8") turning block.
Before mixing the glue, line the form with waxed paper. Attach one side to the form. Soaking the form with oil will not prevent the glued-up turning block from sticking to the form. Waxed paper will. Trust me on this!
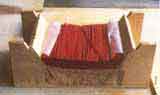
You are now ready to mix glue. Mix the glue in its original container, gradually adding warm water until it is very thick and all lumps are gone. Then add water, thinning until it is soupy. An electric drill with a paint mixing attachment works well. When the glue is mixed, I let it stand for about ten minutes. Then I pour the glue into a flat container with sides about 2" high. Now, I put on gloves and immerse the dowels into the glue. The dowels must be covered with glue. Don't be stingy! The more glue you use, the more gaps are filled, and the turning block will be less apt to come flying apart. You don't want a delaminating dowel bowl blank! Now the glue-soaked dowels are packed tightly in the wax papered form. When all the dowels are in the form, put on the other side. Place the form in the press. Apply enough pressure on the dowels to cause squeeze-out. Since there are sides on the form, the glue will not run out. It will be trapped in the form and help fill voids. After about 3-4 hours, take the sides off so air and heat can penetrate faster. Since this is a large mass of glue, the heat and time requirements are substantially longer than on a simple glue line. With the light/heat setup I use, 80 degrees on the glue line is easily attained. I usually keep pressure on for at least 16 hours.
To glue up a round block for turning a vase or goblet, I use hose clamps. They can be found in most hardware stores in sizes up to 7" or 8" diameters. A 12" tall piece will require four (4) hose clamps. Make sure to tighten them tightly, so there is squeeze-out. Curing times are directly proportional to the diameter of the block. Remember to keep the glue-line at 70 degrees or higher.
After the glue has cured, remove the jack (or hose clamps) and tip the glued turning block out of the form. WEAR GLOVES! The glue line is SHARP! You may have to drop the block on the floor or rap it with a hammer to free it from the form. Remove as much waxed paper from the turning block as you can. Flatten the bottom of the block on a jointer. To obtain a flat end on a round blank, cut the end off with a radial-arm saw or use a disc sander.
Use hardwoods for glue blocks; NOT plywood or pine. Plywood has voids, and you are gluing a 30 pound block to 1/16" veneer! Pine cannot stand much turning pressure; it is soft, causing vibration. Locate the center of the turning block by drawing the diagonals, corner to corner. I use a hole saw (about 4") to make my glue blocks. It gives a round block with a center hole. Center the glue block on the turning block and mark its diameter with a pencil. You can use any woodworking glues, however they all require clamping and at least a 12 hour curing time. I use a cyanoacrilate adhesive called Super-T and "Hot Shot" accelerator. I I put glue on the turning block and accelerator on the glue block, and then put them together within the diameter I marked on the turning block. I rap the glue block with a hammer a couple of times to make sure there is good contact. DO NOT put paper between the glue block and the turning block! This is potentially hazardous to your health.
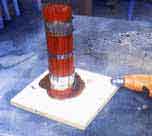
Now, you are ready to attach the faceplate. Center the faceplate with a center finder on the glue block. (see photo) Remember the hole from the hole saw? This makes turning the glue block much easier. (see photo) If the bowl is going to be square, and your lathe will not swing more than 16", you must turn it on the outboard side. If you are going to make a round bowl, cut off the corners on a bandsaw, so it will fit in a 12" swing. You are now ready to turn!
If you turn with the grain perpendicular to the lathe bed, the outside cuts are uphill (from the faceplate to the lip). Turning the inside, start near the center and turn towards the center, gradually working out to the rim. The glued-up dowel blank graphically presents the proper direction for gouge turning. The dowels are, in effect, the vascular vessels of a tree. Going downhill causes severe tear-out, because the dowels do not support each other; going uphill, they do. This is what is meant by "going against the grain" when turning solid wood. If you turn with the grain (dowels) parallel to the lathe bed, you will be cutting downhill, just as in spindle turning. Remember, the dowels represent the vascular vessels of a tree. Turning either perpendicular or parallel to the lathe bed is the same with a dyed dowel turning block as with any solid wood turning block, with this exception: Turning downhill, against the dowels ("against the grain"), creates a lot more tear-out than going against the grain in a regular turning block.
After turning the bowl, sand to 220 grit. I use power sanders for speed, then finish sanding by hand. WEAR DUST PROTECTION! You MUST protect against toxins in the wood, urea-formaldehyde glue dust, residual methanol, and aniline dye!
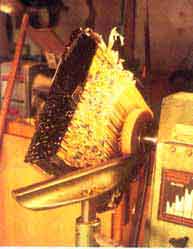
You are now ready to turn the glue block. Take off the faceplate, place a turning jam on the lathe (see photo) and align the tailstock with the hole in the glue block. This will automatically center the bowl on the jam. Set the toolrest just below center and with a 3/8" gouge, turn out the screw holes or turn off the glue block. I usually leave the glue block on to give a sharp contrast to the dyed dowels and to create a small foot for the bowl. Leave the center nub large enough so it will not break during this procedure. Carve it off after you have turned the bottom. You can part off the glue block or even cut it off with a saw, but I like to turn the whole bowl, including the bottom.
Many finishing products can be used. I use Minwax Antique Oil, to bring out the colors. Then, I apply two coats of sealer and two coats of semi-gloss lacquer. After at least 24 hours, I rub out the final coat with "0000" steel wool, apply a thin coat of Trewax (clear), and buff with a clean, soft cloth.
It is impossible to explain every aspect of a new idea in this brief article. I have provided guidelines to the most difficult processes of the technique. I am still making refinements! Now you have a starting place; begin experimenting on your own!
Copy Right © Howard Lewin 1992 All Rights Reserved